The List object is a generic selection widget, something like an HTML Select List but much more configurable. I specifically built this object with the intent for it to be incorporated into larger and more complex widgets - it forms the basis for other widgets to be made. The widgets I've created using this object are the SelectList, ScrollList, and MenuList.
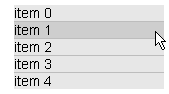
Here's what the default List widget looks like:
All the colors, spacing, font, and of course the items contained are easily changed. I've also included code so that you make a multiple-columned list, and have a swappable image inside the list. The latter is mainly used by the MenuList object.
First off, you need dynlayer.js and list.js
There's only 4 parameters needed initally:
objectName = new List(x,y,width,itemH)
The itemH parameter is optional. This refers to the height of each item in the list. To make the List object a little better, I allowed this to be left undefined, and make the List automatically build itself according to the minimum height that each item must be. This avoids any font sizing problems between platforms because no matter which font is used, the text inside the list will always be compact and evenly spaced. The only drawback for this is it takes a little longer to initialize and you'll never know the total height of the list. If you do set the itemH property you are able to set a specific height
Examples:
mylist = new List(30,40,150)  // itemH will be taken care of automatically

mylist = new List(30,40,150,30) // each item will be 30 pixels tall
Adding Items to the List
To add items to the list you use the add() method:
objectName.add(value,text)
The value specified is how each item will contain it's data. This can be any variable; a number, string (such as URL), or even arrays and objects. The text will be the text shown in the List.
Example:
mylist.add('index.html','Home')
mylist.add('page1.html','Page 1')
mylist.add('page2.html','Page 2')
Multi-Columned List
The list object can be used to mimic a table of items by using the multi-column feature. To do this you add the desired number of cell text values in the add() method as well:
objectName.add(value,text1,text2,text3 etc....)
You must set the widths of column before you do this though. Just send a list of pixels widths to the setCols() method. Heres an example:
mylist = new List(50,50,150)
mylist.setCols(50,50,50)  // 3 columns, should add up to the total width
mylist.add(0,'item','0','zero')
mylist.add(1,'item','1','one')
mylist.add(2,'item','2','two')
mylist.add(3,'item','3','three')
mylist.add(4,'item','4','four')
Building and Activating the List
This is done just like all my widgets. Call the build() method when you're done setting everything up, write the CSS and Div's to the page, and then call the activate() method. Here's a complete example:
<html>
<head>
<title>The Dynamic Duo - List Object Demo 1</title>
<script language="JavaScript" src="../dynlayer/dynlayer.js"></script>
<script language="JavaScript" src="list.js"></script>
<script language="JavaScript">

function init() {
	mylist.activate()
}

mylist = new List(50,50,150)
mylist.add('zero','item 0')
mylist.add('one','item 1')
mylist.add('two','item 2')
mylist.add('three','item 3')
mylist.add('four','item 4')
mylist.build()

writeCSS (
mylist.css
)

</script>
</head>

<body bgcolor="#ffffff" onLoad="init()">

<script language="JavaScript">
document.write(mylist.div)
</script>

</body>
</html>
View the code above in list1.html. View Source Code.
View list2-multicol.html for a an multiple column list example. View Source Code.
The properties below can be used to change how it looks. This is what the defaults are:
itemSpacing = 1
fontname = 'Helvetica'
fontsize = 11
visibility = 'inherit'

color.textNormal = '#000000'
color.textSelected = '#FFFFFF'
color.bgNormal = '#E6E6E6'
color.bgSelected = '#0000A0'
color.bgRollover = '#D1D1D1'
color.bg = '#C0C0C0'
The only ones worth explaining is the itemSpacing and color.bg properties. The itemSpacing is the number of pixels that separates each item in the list. The background color (color.bg) will be the color between the items. The other properties are self-explanitory.
View list3-custom.html for a List example that has different colors and stuff. View Source
The List has built in properties and methods, so that you can utilize it for any occasion.
Properties:
preSelect (integer)
w (integer)
h (integer)
Methods:
View list4-props.html for an example using most of these properties, it'll give you a better idea of how to use them. View Source Code.
The onSelect event is a called after an item is selected. Usually you'll want to assign a handler to this event to do something like redirect the browser to a url (which would be set by the values of the items in the list). To assign the handler, just set it to a function that will be created by you:
objectName.onSelect = myFunction
That function will become part of that List object and you'll will be able to use any of the properties. As an example fuction, I have already included a redirect handler in the List Object (you will have to manually assign this handler though):
function ListRedirect() {
	location.href = this.value
}
To assign it you'd just write:
objectName.onSelect = ListRedirect
View list5-redirect.html for a redirection example. View Source Code.
I implemented an image option specifically for use in the MenuList object, but this may be of use elsewhere. What this does is stick an image to the right side of the item, and will swap it with a 'selected' state iamge when you click on it. For the MenuList, this would usually be an image of an arrow. By default this image appears on the right side, but this would be changeable if you edit the source code to the List Object.
To use this option there are 2 steps. First you call the setImage() method:
object.setImage(image0,image1,width,height)
Where:
Example:
mylist.setImage('image-off.gif','image-on.gif',20,20)
After calling this method, you must assign the image to the items that you want. You do this by setting an additional property, hasImage, to the item you want:
mylist.setImage('image-off.gif','image-on.gif',20,20)
mylist.items[0].hasImage = true
View list6-image.html for an image example. View Source Code.
This object by itself is rather bland, I really didn't write it with intention for it to be used individually, rather to be used as the basis in a few other widgets I had in mind. To see what I did to extend this object take read through the following lessons:
Download: list.js
View Source: list.js
| Home | Next Lesson: SelectList Object |